What Is QGIS?
QGIS also known as Quantum GIS, is a free and open-source application for desktop Geographic information that supports viewing, editing, and monitoring of Geospatial information. It can be downloaded for free for Windows, Mac, Linux, BSD, and mobile devices. It also enables a wide range of multiple spatial data analyses through various tools and plugins.
Location Data For Visualization
We will use Subway store location datasets in United States from the Locationscloud store.
Visualizing Point Data Over The Base Map
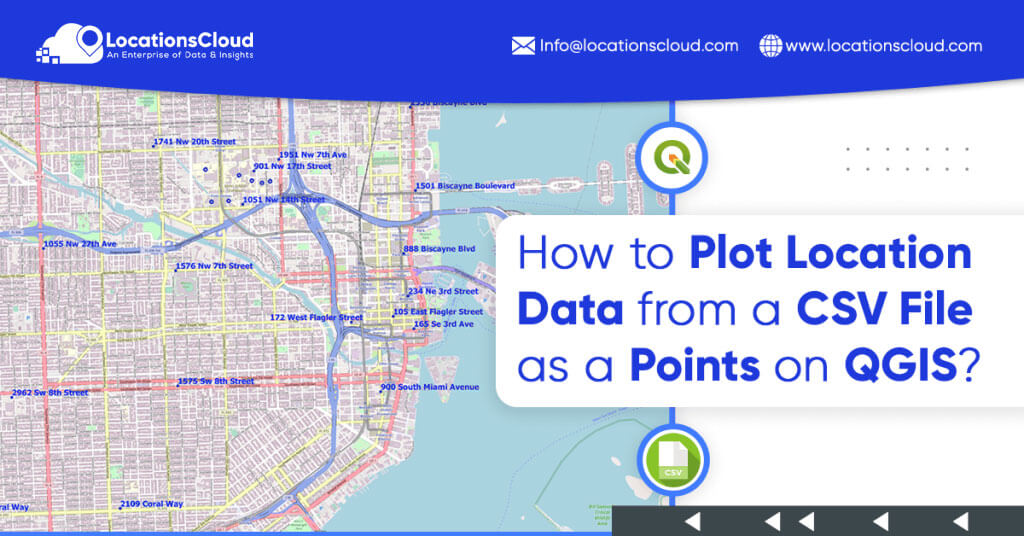
The simplest method to know the store location data more is to plot it on the map. When we map points on a 2D surface, we can easily see their spatial relationships, such as closeness or aggregation. By just visually analyzing the data points plotted above a topographic map, we can learn more about the data points. You may find out the locations of the stores in the city and nearby towns, roads, lakes, and other geographical locations.
The following are the steps of placing position information over a region/base country’s map:
- Import the default map.
- As just a point vector, import the CSV file from the Locationscloud shop.
- Modify the symbology and label everything correctly.
- QGIS allows you to save the map as an image or a PDF.
Importing The Base Map
The Base map layer gives background details like roads, points of interest, building footprints, rivers, etc. Because Open Street Maps (OSM) is indeed the default in QGIS, we’ll employ it as our foundation map. You can also utilize Google Maps, Mapbox, Bing Maps, and other similar base maps.
Select Layers tab from the main toolbar, select AddLayer>AddXYZLayer>Select OpenStreetMap>Add.
Throughout the QGIS layers tab, OSM has been included as a layer and it can be viewed in the map canvas area.
Importing The CSV File As A Point Vector
We’ll import the shop location data as just a point vector layer after we include the base map. The CSV file picked up from Locationscloud will appear as shown below. The data will be fetched in an excel sheet. Each entry present in the table has Latitude and Longitude, depending on which we can plot the points.
The latitudes and longitudes are the types of coordinates and every entry in the table will be inserted as a point vector. Here, we will assign Longitude as the X-coordinate and latitude as Y-coordinate to a fresh ‘Delimited Text Layer’.
Go to the Layers tab from the main toolbar then select AddLayer> Add Delimited Text layer.
Browse for the Locationscloud CSV file in the ‘Data Source Manager’ box that appears. Choose X and Y fields for latitude and longitude respectively. Also, choose the related Geometry CRS (Coordinate reference system) depending on the area or country you are living. For the United States, EPSG 4326 – WGS 84 is considered.
Add button must add various points to a layer of Subway store locations over the base map. Then, Right-click on the data layer and choose ‘Zoom to layer’ option, you will see the below image:
Edit The Symbology And Label Properly
To make the map more attractive, let’s alter the symbology of both the point vector layers. The size, color, shape, and other attributes of the symbols used in each point are referred to as symbology.
Right-clicking the point data layer, choose properties, and go to the symbology tab.
Choose the ‘Single Symbol’ option from the symbology box. Make any necessary changes to the symbol’s size, color, and type.
To assign a label to every other point of data, right-click the layer, pick properties, and then the Label option. Here we may choose the field to be used as the label and change the label’s other characteristics.
Choose ‘Single Label’ and then ‘Value’ entry from the table as the label. Each store’s location name is labeled here. Set the font, font color, font size, opacity, and other parameters to your preference.
The map after editing the symbology, and labels will be somewhat
Exporting Map As An Image Or PDF
We can save the map we’re looking at in QGIS’ Image canvas area as a PDF or an Image (png). We’re only exporting a portion of the map in this report. Right-click the image layer and select the ‘Zoom to Layer ‘option to export the complete map. In that scenario, you can disable the labels for a more professional appearance.
For the time being, we’ll just export a basic map without any additional map elements. If necessary, you can use QGIS to include legends, scale, north arrows, and other map components.
Firstly, zoom and slide the image across the canvas to export it in PDF or PNG format.
Go to the project>Import/Export>Export as Image for png format or Export as PDF to receive the final map in PDF format.
For any queries, contact LocationsCloud, today!!